How to deploy a single Kubernetes cluster across multiple clouds using k3s and WireGuard
Kubernetes is hard enough, and now your boss tells you to migrate your application from AWS to Azure, split your back end and front end between public and private data centers, and deploy to six different environments simultaneously.
Before you decide to quit your brand new DevOps job, let's see if we can set this up an easier way.
You look around and find a whole slew of tools out there for managing multiple Kubernetes clusters across environments, and many may even help you deploy your app. However, this all raises an important question: Why run multiple Kubernetes clusters at all?
Kubernetes is a control plane plus managed worker nodes. Why can’t you just deploy these worker nodes to different environments and be done with it?
There are two answers you’ll typically hear:
- You can't do that because of latency.
- You can't do that because of security.
Well, I’m here to tell you that you can do it, and that it’s easier than you might have thought.
The Solution
1. You can't do that because of latency. Well, we’re just gonna go ahead and use k3s. The latency problem with Kubernetes is due to Etcd, which is sensitive to lower performance environments. K3s lets you use SQL which doesn’t have that issue. An alternative approach might be to co-locate your masters while having distributed workers. If you have a different suggestion/solution to Etcd’s latency intolerance, go ahead and post it in the comments.
2. You can't do that because of security. We’re gonna run this over WireGuard. WireGuard is fantastic. You can learn more about it here, but in summation, we can create encrypted tunnels between all our nodes to keep the traffic secure while minimizing the impact on latency.
However, there is one little hiccup in #2. For a very small number of machines that will stay the same, you can just manually configure WireGuard.
However, for larger or dynamic networks, WireGuard quickly becomes a PITA to manage and configure without automation. Let’s say we want to add and remove nodes from our cluster on the fly. We’ll probably want a third-party tool.
There are many tools out there that simplify WireGuard management, but we’re gonna use Netmaker. Why? Well in part, because I wrote it! But it also works well for this use case. However, if you don’t like it, you can use Kilo, Wormhole, Ansible scripts, or one of the dozens of WireGuard config manager tools out there. Or, just set it up manually. Arch has good docs.
Ok, ready to get started?
By the way, if you’re more of a visual learner, you can also follow along with this YouTube tutorial.
The Setup
A couple of quick notes: I’m trying to keep this short and sweet. For that reason, we’re not gonna set up DNS, storage, or High Availability. All of these are pretty easy to set up on top of what we’re deploying, but we’ll save that for a future post. This is meant for demonstration purposes only and isn’t something you should run in production.
Get yourself a few cloud VM’s. It doesn’t really matter where, they just need public IP’s. In my configuration I have one Linode, two AWS EC2's, and a machine on my home network. Three will act as the cluster, and one will run Netmaker.
So, let's set up our nodes. on each machine, install Ubuntu 20.04. A bunch of other OS’s will work too if you prefer something else, but we recommend systemd-based linux (feel free to chuck your computer out the window in anger).
On each cluster node, install wireguard-tools. (e.g. apt install wireguard-tools)
On the Netmaker VM, install docker and docker-compose:
Additionally, make sure ports 80, 8081, and 50051 are open on the Netmaker VM.
Part 1: Netmaker Install / WireGuard Setup
The first thing we’re gonna need is a flat, secure network for our cluster nodes to communicate. We’ll create a “virtual” subnet of 10.11.11.0/24 and add our nodes to it.
ssh root@netmaker-vm
wget -O docker-compose.yml https://raw.githubusercontent.com/gravitl/netmaker/master/docker-compose.nodns.yml
sed -i ‘s/your-backend/< Your VM IP Address Here >/g’ docker-compose.yml
sudo docker-compose up -d
That’s it! Now head to the IP of that EC2 instance and we should get the UI of Netmaker.

Create a user and log in with it.
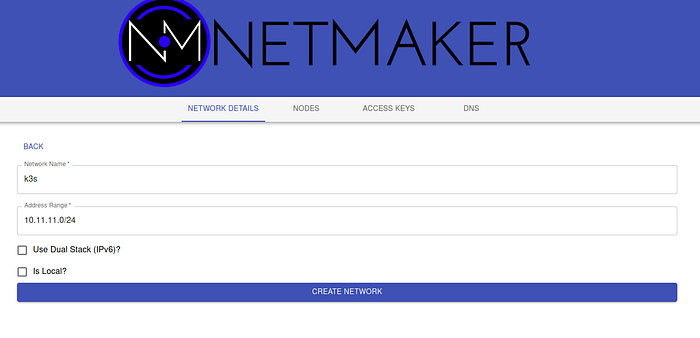
Now, let’s make a network called k3s. Just click “Create Network” in the upper left. We’re gonna give it a name of k3s and an address range of 10.11.11.0/24
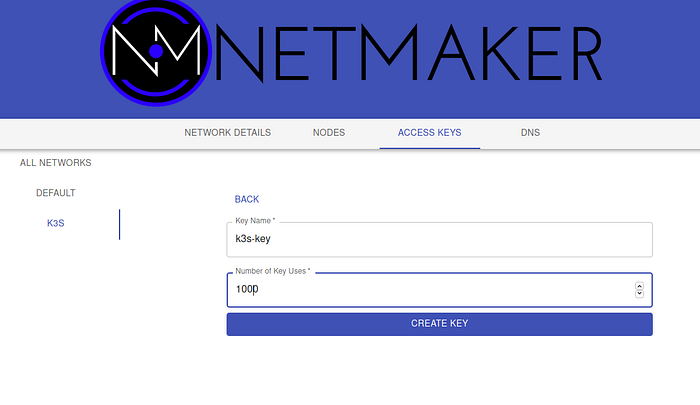
Perfect. Now we are ready to setup our nodes. First, click on “Access Keys”, select your network (k3s) and create a key. The name doesn’t matter but we’ll call it k3s-key and give it 1000 uses. Hey, you never know, this could end up being a big cluster. Click create and copy down the info, especially that install script. (curl -sfL … | KEY=… sh -)
Now time to deploy the netclient on your cluster VM’s. SSH to each Ubuntu VM and run the following.
Make sure you have already installed the wireguard-tools package before running this.
1. which wg-quick
2. sudo su -
3. curl -sfL https://raw.githubusercontent.com/gravitl/netmaker/v0.3/scripts/netclient-install.sh | KEY=<YOUR ACCESS KEY FROM NETMAKER> sh -
Now a quick look at WireGuard should show us if things are good:
wg show
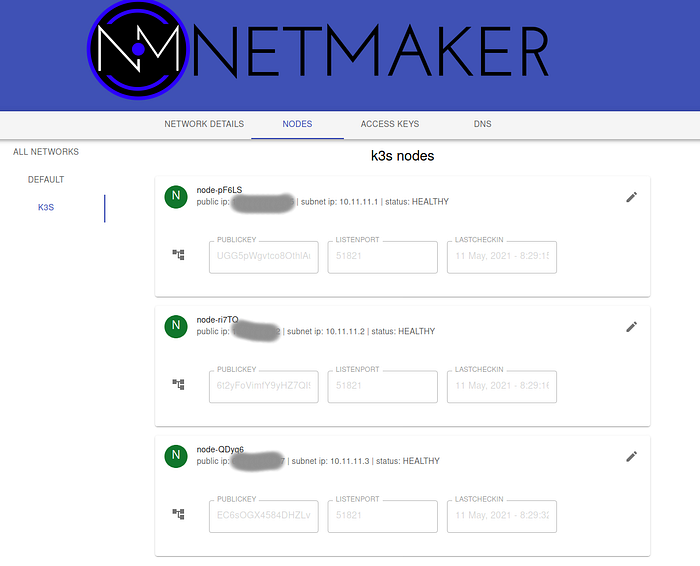
If wg show shows the interface on each node, you should be good! One last check in the UI. It should look like this. You should see all the nodes and they should be green.
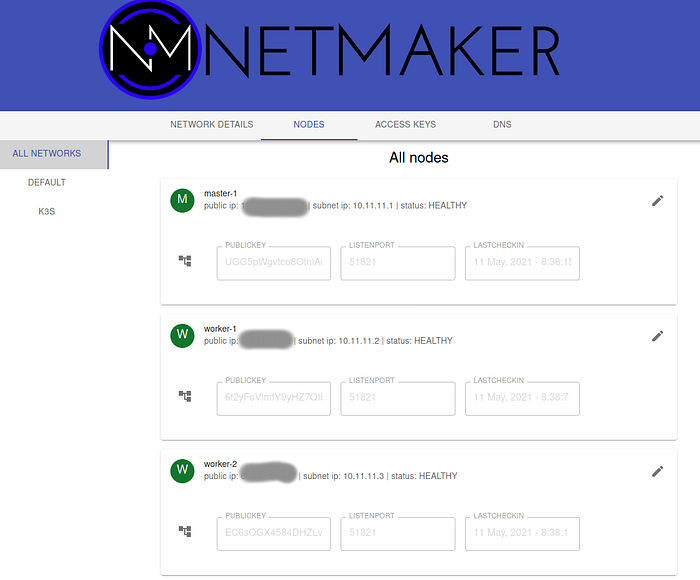
Looks good. Feel free to edit those names to be something more sensible if you’d like. I’m changing mine to match my layout.
You can use this process to add however many nodes you’d like into your cluster, but for now, lets move on.
Part 2: K3S Installation
SSH to the node that will be your master node and run the following:
sudo su -
ip a
You should see an address under nm-k3s . Use that address. If you installed WireGuard via Netmaker on the master first, it should be 10.11.11.1. If not, replace in the below script with your address.
curl -sfL https://get.k3s.io | INSTALL_K3S_EXEC=”server --node-ip 10.11.11.1 --node-external-ip 10.11.11.1 --flannel-iface nm-k3s” sh -
Let bake for approximately 5 minutes.
systemctl status k3s.
kubectl get nodes
kubectl get pods --all-namespaces
Assuming everything looks good and all pods are running, you can deploy the workers. But first, get the node key from the server:
cat /var/lib/rancher/k3s/server/node-token
Okay, now, on each of your worker nodes run the following:
sudo su -
ip a
Get that private IP address and run the below command, replacing < TOKEN VAL > with the output of cat /var/lib/rancher/k3s/server/node-token from the server, 10.11.11.X with your ip address from ip a , and 10.11.11.MASTER with the master private IP address (e.g. 10.11.11.1).
curl -sfL https://get.k3s.io | INSTALL_K3S_EXEC=”agent --server https://10.11.11.MASTER:6443 --token < TOKEN VAL > --node-ip 10.11.11.X --node-external-ip 10.11.11.X --flannel-iface nm-k3s” sh -
systemctl status k3s-agent
Back on the master, lets see how things look:
sudo kubectl get nodes
sudo kubectl get pods --all-namespaces -o wide
If all of your nodes are showing and you’ve got pods running on them, you’re all set!

Now lets make sure this is really working. Our nodes are up, but do our pods and services work across clouds? Let’s find out.
Part 4: Testing
Deploy pingtest. These are just simple containers with “ping” installed (Calico also has a guide for this).
Create pingtest.yaml
YAML: https://pastebin.com/BSqLnP57
kubectl create namespace pingtest
kubectl apply -f pingtest.yaml
kubectl get pods -n pingtest -o wide

Great, we’ve got 3 pods running on all 3 nodes. If you’ve got more pingtest pods than nodes, additional pods will get stuck in pending (like above), which is fine for this test.
Now exec into one of those pods and ping the other pod IP’s:

Great! We can ping the pods running in different clouds. Time for one last test. will our service network work across clouds? Let’s deploy an nginx server with a load balancing service in front.
YAML: https://pastebin.com/ttadjjDA
kubectl create namespace nginx
kubectl apply -f nginx.yaml -n nginx
Now exec back into a pingtest pod that is running on different host from the nginx pods and try to grab the index.html using the cluster service name
kubectl exec -ti pingtest-69ff695cfd-8svc8 -n pingtest -- sh
wget nginx.nginx.svc.cluster.local
If you are able to retrieve the document, then congratulations, you’re all set with a cross-cloud Kubernete cluster!
Conclusion
That wasn’t too bad, was it? We created a single Kubernetes cluster that spans multiple clouds using K3S and WireGuard. If we ever want to add more nodes to it, the process is pretty straightforward. Just run the Netmaker install script and the K3S install script on the node.
There’s a lot more we can do, like set up High Availability with multiple masters, add Ingress, and create distributed storage.
In addition, now that we have a single cluster running in multiple clouds, there are many new deployment patterns we can use. We can run a hybrid cloud app, we can move apps from cloud to cloud, and a lot of other things.
We can also deploy Netmaker in a special way so that it becomes part of the cluster after the cluster spins up, removing the need for that extra VM.
However, these are all topics for a future post. This was just a quick introduction to setting up a cross-cloud cluster. For now, good luck! Let me know of any problems you run into in the comments.
If you are interested in discussing this pattern for your business, you can reach out via info@gravitl.com or https://gravitl.com/book.